Page 1 of 1

浅析基于ARM的Linux下的系统调用的实现

Posted: 2025-03-06T02:49:36+00:00
by 擎天殿
浅析基于ARM的Linux下的系统调用的实现


在Linux下系统调用是用软中断实现的,下面以一个简单的open例子简要分析一下应用层的open是如何调用到内核中的sys_open的。

t8.c

Code: Select all

#include <stdio.h>
#include <sys/types.h>
#include <sys/stat.h>
#include <fcntl.h>


int main(int argc, const char *argv[])

 {

  int fd;


    fd = open(".", O_RDWR);
 

     close(fd);

    return 0;
  }
这里需要注意的是:open是C库提供的库函数,并不是系统调用,系统调用时在内核空间的,应用空间无法直接调用。在《Linux内核设计与实现》中说:要访问系统调用(在Linux中常称作syscall),通常通过C库中定义的函数调用来进行。

将t8.c进行静态编译,然后反汇编,看一下是如何调用open的?

Code: Select all

  arm-linux-gcc t8.c --static

  arm-linux-objdump -D a.out >a.dis

下面我们截取a.dis中的一部分进行说明:

Code: Select all

 ......

 00008228 <main>:

    8228:   e92d4800    push    {fp, lr}

   822c:   e28db004    add fp, sp, #4  ; 0x4

    8230:   e24dd010    sub sp, sp, #16 ; 0x10
    8234:   e50b0010    str r0, [fp, #-16]

    8238:   e50b1014    str r1, [fp, #-20]

     823c:   e59f0028    ldr r0, [pc, #40]   ; 826c <main+0x44>

     8240:   e3a01002    mov r1, #2  ; 0x2   ;  #define  O_RDWR  00000002 

       8244:   eb002e7d    bl  13c40 <__libc_open>

     8248:   e1a03000    mov r3, r0

    824c:   e50b3008    str r3, [fp, #-8]

    8250:   e51b0008    ldr r0, [fp, #-8]

      8254:   eb002e9d    bl  13cd0 <__libc_close>

    8258:   e3a03000    mov r3, #0  ; 0x0

     825c:   e1a00003    mov r0, r3

    8260:   e24bd004    sub sp, fp, #4  ; 0x4

     8264:   e8bd4800    pop {fp, lr}

     8268:   e12fff1e    bx  lr
   826c:   00064b8c    .word   0x00064b8c

  ......

00013c40 <__libc_open>:

     13c40:   e51fc028    ldr ip, [pc, #-40]  ; 13c20 <___fxstat64+0x50>

    13c44:   e79fc00c    ldr ip, [pc, ip]

    13c48:   e33c0000    teq ip, #0  ; 0x0

    13c4c:   1a000006    bne 13c6c <__libc_open+0x2c>

    13c50:   e1a0c007    mov ip, r7

    13c54:   e3a07005    mov r7, #5  ; 0x5   

  #在arch/arm/include/asm/unistd.h中:#define __NR_open  (__NR_SYSCALL_BASE+5)

                    其中,__NR_OABI_SYSCALL_BASE是0


13c58: ef000000 svc 0x00000000 #产生软中断

     13c5c:   e1a0700c    mov r7, ip

    13c60:   e3700a01    cmn r0, #4096   ; 0x1000

    13c64:   312fff1e    bxcc    lr
   13c68:   ea0008d4    b   15fc0 <__syscall_error>

  34:  ......
通过上面的代码注释,可以看到,系统调用sys_open的系统调用号是5,将系统调用号存放到寄存器R7当中,然后应用程序通过svc 0x00000000产生软中断,陷入内核空间。

也许会好奇,ARM软中断不是用SWI吗,这里怎么变成了SVC了,请看下面一段话,是从ARM官网copy的:
SVC

超级用户调用。
语法

SVC{cond} #immed

其中:

cond

是一个可选的条件代码(请参阅条件执行)。
immed

是一个表达式,其取值为以下范围内的一个整数:

在 ARM 指令中为 0 到 224–1(24 位值)

在 16 位 Thumb 指令中为 0-255(8 位值)。

用法

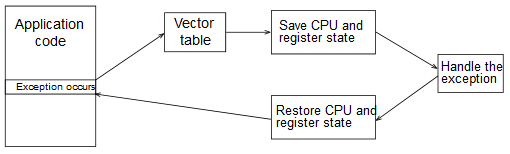
SVC 指令会引发一个异常。 这意味着处理器模式会更改为超级用户模式,CPSR 会保存到超级用户模式 SPSR,并且执行会跳转到 SVC 向量(请参阅《开发指南》中的第 6 章 处理处理器异常)。

处理器会忽略 immed。 但异常处理程序会获取它,借以确定所请求的服务。
Note

作为 ARM 汇编语言开发成果的一部分,SWI 指令已重命名为 SVC。 在此版本的 RVCT 中,SWI 指令反汇编为 SVC,并提供注释以指明这是以前的 SWI。
条件标记

此指令不更改标记。
体系结构

此 ARM 指令可用于所有版本的 ARM 体系结构。


在基于ARM的Linux中,异常向量表已经被放置在了0xFFFF0000这个位置。这个过程的完成:


start_kernel ---> setup_arch ---> early_trap_init

Code: Select all

    void __init early_trap_init(void)

     {

        unsigned long vectors = CONFIG_VECTORS_BASE;  // 就是0xFFFF0000

        extern char __stubs_start[], __stubs_end[];

        extern char __vectors_start[], __vectors_end[];

       extern char __kuser_helper_start[], __kuser_helper_end[];

       int kuser_sz = __kuser_helper_end - __kuser_helper_start;


        /*

         * Copy the vectors, stubs and kuser helpers (in entry-armv.S)

         * into the vector page, mapped at 0xffff0000, and ensure these

         * are visible to the instruction stream.

        */

        memcpy((void *)vectors, __vectors_start, __vectors_end - __vectors_start);

       memcpy((void *)vectors + 0x200, __stubs_start, __stubs_end - __stubs_start);

       memcpy((void *)vectors + 0x1000 - kuser_sz, __kuser_helper_start, kuser_sz);


        /*

        * Copy signal return handlers into the vector page, and

        * set sigreturn to be a pointer to these.

       */

      memcpy((void *)KERN_SIGRETURN_CODE, sigreturn_codes,

             sizeof(sigreturn_codes));


     flush_icache_range(vectors, vectors + PAGE_SIZE);

     modify_domain(DOMAIN_USER, DOMAIN_CLIENT);

 }
关于上面这个函数的详细解释,参见:


http://www.cnblogs.com/pengdonglin137/p/3603549.html

把异常中断向量表的位置设置为0xffff0000的话,需要修改协处理器CP15的寄存器C1的第13位,将其设置为1。以Tq2440的提供的内核2.6.30.4为例看一下:

Code: Select all

 arch/arm/kernel/head.S

   adr    lr, __enable_mmu        @ return (PIC) address

    add    pc, r10, #PROCINFO_INITFUNC
其中,PROCINFO_INITFUNC的值是16,r10的值是__arm920_proc_info的地址:

Code: Select all

  __arm920_proc_info:

      .long    0x41009200
    .long    0xff00fff0

      .long   PMD_TYPE_SECT | \

        PMD_SECT_BUFFERABLE | \

          PMD_SECT_CACHEABLE | \

          PMD_BIT4 | \

          PMD_SECT_AP_WRITE | \

          PMD_SECT_AP_READ

     .long   PMD_TYPE_SECT | \
         PMD_BIT4 | \

         PMD_SECT_AP_WRITE | \
         PMD_SECT_AP_READ
      b    __arm920_setup

    .long    cpu_arch_name

     .long    cpu_elf_name

      ......

     .size    __arm920_proc_info, . - __arm920_proc_info


看一下__arm920_setup的实现(proc-arm920.S (arch\arm\mm)):

Code: Select all

      .type    __arm920_setup, #function

  __arm920_setup:

      mov    r0, #0

      mcr    p15, 0, r0, c7, c7        @ invalidate I,D caches on v4

     mcr    p15, 0, r0, c7, c10, 4        @ drain write buffer on v4

   #ifdef CONFIG_MMU

        mcr    p15, 0, r0, c8, c7        @ invalidate I,D TLBs on v4

   #endif

        adr    r5, arm920_crval

       ldmia    r5, {r5, r6}            @ 参看以下下面的arm920_crval的实现,本句话执行完后r5和r6分别为:0x3f3f和0x3135

      mrc    p15, 0, r0, c1, c0        @ get control register v4   获取协处理器p15的寄存器才c1

     bic r0, r0, r5
  
   orr r0, r0, r6 @ 我们只关注第13位,这里将r0的第13位设置为了1


mov pc, lr

      .size    __arm920_setup, . - __arm920_setup


        /*

        *  R

       * .RVI ZFRS BLDP WCAM

        * ..11 0001 ..11 0101

       * 

       */

      .type    arm920_crval, #object

   arm920_crval:

       crval    clear=0x00003f3f, mmuset=0x00003135, ucset=0x00001130
在看一下crval的实现(proc-macros.S (arch\arm\mm)):

Code: Select all

       .macro    crval, clear, mmuset, ucset

   #ifdef CONFIG_MMU

       .word    \clear

        .word    \mmuset

     #else

         .word    \clear

         .word    \ucset

     #endif

         .endm


在__arm920_setup中执行完 mov pc, lr后,便跳入了下面的语句:

Code: Select all

     __enable_mmu:

     #ifdef CONFIG_ALIGNMENT_TRAP

         orr    r0, r0, #CR_A

     #else

         bic    r0, r0, #CR_A

     #endif

     #ifdef CONFIG_CPU_DCACHE_DISABLE

         bic    r0, r0, #CR_C

     #endif

    #ifdef CONFIG_CPU_BPREDICT_DISABLE

        bic    r0, r0, #CR_Z

    #endif

    #ifdef CONFIG_CPU_ICACHE_DISABLE

        bic    r0, r0, #CR_I

    #endif

        mov    r5, #(domain_val(DOMAIN_USER, DOMAIN_MANAGER) | \

                  domain_val(DOMAIN_KERNEL, DOMAIN_MANAGER) | \

                  domain_val(DOMAIN_TABLE, DOMAIN_MANAGER) | \

                  domain_val(DOMAIN_IO, DOMAIN_CLIENT))

        mcr    p15, 0, r5, c3, c0, 0        @ load domain access register

        mcr    p15, 0, r4, c2, c0, 0        @ load page table pointer

        b    __turn_mmu_on

    ENDPROC(__enable_mmu)

看一下__turn_mmu_on的实现(head.S (arch\arm\kernel)):

Code: Select all


         .align    5

     __turn_mmu_on:

         mov    r0, r0

         mcr    p15, 0, r0, c1, c0, 0        @ write control reg

         mrc    p15, 0, r3, c0, c0, 0        @ read id reg

         mov    r3, r3

         mov    r3, r3

         mov    pc, r13

     ENDPROC(__turn_mmu_on)
在__turn_mmu_on中,将寄存器r0的值写到了cp15协处理器的寄存器C1中。到这里便完成了将异常中断向量表的位置放到了0xffff0000.


说完异常向量表的位置,接下来看看软中断的实现。

ARM提供的中断类型:

Image

ARM的异常处理模型:

Image

entry-armv.S (arch\arm\kernel)

Code: Select all

    .LCvswi:


.word vector_swi


         .globl    __stubs_end

     __stubs_end:


         .equ    stubs_offset, __vectors_start + 0x200 - __stubs_start


         .globl    __vectors_start

    __vectors_start:

        swi    SYS_ERROR0

        b    vector_und + stubs_offset

        ldr    pc, .LCvswi + stubs_offset     @发生软中断后先跳到这里

        b    vector_pabt + stubs_offset

        b    vector_dabt + stubs_offset

        b    vector_addrexcptn + stubs_offset

        b    vector_irq + stubs_offset

        b    vector_fiq + stubs_offset


        .globl    __vectors_end

    __vectors_end:


        .data


        .globl    cr_alignment

        .globl    cr_no_alignment

    cr_alignment:

        .space    4

    cr_no_alignment:

        .space    4

接下来看一下vector_swi的实现,根据实际的宏定义进行了简化

Code: Select all

     ENTRY(vector_swi)

         sub    sp, sp, #S_FRAME_SIZE

         stmia    sp, {r0 - r12}            @ Calling r0 - r12

         add    r8, sp, #S_PC

         stmdb    r8, {sp, lr}^            @ Calling sp, lr

         mrs    r8, spsr            @ called from non-FIQ mode, so ok.

         str    lr, [sp, #S_PC]            @ Save calling PC

         str    r8, [sp, #S_PSR]        @ Save CPSR

         str    r0, [sp, #S_OLD_R0]        @ Save OLD_R0

        zero_fp


        /*

         * Get the system call number.

         */


        /*

         * If we have CONFIG_OABI_COMPAT then we need to look at the swi

         * value to determine if it is an EABI or an old ABI call.

         */

        ldr    r10, [lr, #-4]   

            @ get SWI instruction  r10中存放的就是引起软中断的那条指令的机器码

              发生软中断的时候,系统自动将PC-4存放到了lr寄存器,由于是三级流水,

              并且是ARM状态,还需要减4才能得到发生软中断的那条指令的机器码所在的地址

      A710(    and    ip, r10, #0x0f000000        @ check for SWI        )

      A710(    teq    ip, #0x0f000000                        )

      A710(    bne    .Larm710bug                        )


        ldr    ip, __cr_alignment

        ldr    ip, [ip]

        mcr    p15, 0, ip, c1, c0        @ update control register

        enable_irq   @在发生中断的时候,相应的中断线在在所有CPU上都会被屏蔽掉


get_thread_info tsk @ 参看下面的介绍

 adr tbl, sys_call_table

@ load syscall table pointer 此时tbl(r8)中存放的就是sys_call_table的起始地址


        ldr    ip, [tsk, #TI_FLAGS]        @ check for syscall tracing


        /*

         * If the swi argument is zero, this is an EABI call and we do nothing.

         *

         * If this is an old ABI call, get the syscall number into scno and

         * get the old ABI syscall table address.

         */

        bics    r10, r10, #0xff000000

        eorne    scno, r10, #__NR_OABI_SYSCALL_BASE

        ldr

ne

    tbl, =sys_oabi_call_table


        stmdb    sp!, {r4, r5}            @ push fifth and sixth args

        tst    ip, #_TIF_SYSCALL_TRACE        @ are we tracing syscalls?

        bne    __sys_trace


        cmp    scno, #NR_syscalls        @ check upper syscall limit

        adr    lr, ret_fast_syscall        @ return address


ldrcc pc, [tbl, scno, lsl #2] @ call sys_* routine


        add    r1, sp, #S_OFF

    2:    mov    why, #0                @ no longer a real syscall

        cmp    scno, #(__ARM_NR_BASE - __NR_SYSCALL_BASE)

        eor    r0, scno, #__NR_SYSCALL_BASE    @ put OS number back

        bcs    arm_syscall

        b    sys_ni_syscall            @ not private func

    ENDPROC(vector_swi)
entry-common.S (arch\arm\kernel下面是entry-header.S (arch\arm\kernel)的部分内容:


common.S (arch\arm\kernel下面是entry-header.S (arch\arm\kernel)的部分内容:

Code: Select all

     /*

      * These are the registers used in the syscall handler, and allow us to

      * have in theory up to 7 arguments to a function - r0 to r6.

      *

      * r7 is reserved for the system call number for thumb mode.

      *

      * Note that tbl == why is intentional.

      *

      * We must set at least "tsk" and "why" when calling ret_with_reschedule.

     */

    scno    .req    r7        @ syscall number

    tbl    .req    r8        @ syscall table pointer

    why    .req    r8        @ Linux syscall (!= 0)

    tsk    .req    r9        @ current thread_info
.req 是伪汇编,以 scno .req r7 为例,表示scno是寄存器r7的别名。

Re: 浅析基于ARM的Linux下的系统调用的实现

Posted: 2025-03-06T02:51:05+00:00
by 擎天殿
get_thread_info tsk

其中,tsk是寄存器r9的别名,get_thread_info是一个宏定义,如下:

Code: Select all

         .macro    get_thread_info, rd

       mov    \rd, sp, lsr #13

         mov    \rd, \rd, lsl #13

         .endm
即:将sp进行8KB对齐后的值赋给寄存器r9,什么意思?

这个就涉及到Linux的内核栈了。Linux为每个进程都分配了一个8KB的内核栈,在内核栈的尾端存放有关于这个进程的struct therad_info结构:

Code: Select all


     struct thread_info {

         unsigned long        flags;        /* low level flags */

         int            preempt_count;    /* 0 => preemptable, <0 => bug */

         mm_segment_t        addr_limit;    /* address limit */

         struct task_struct    *task;        /* main task structure */

         struct exec_domain    *exec_domain;    /* execution domain */

         __u32            cpu;        /* cpu */

         __u32            cpu_domain;    /* cpu domain */

         struct cpu_context_save    cpu_context;    /* cpu context */

        __u32            syscall;    /* syscall number */

        __u8            used_cp[16];    /* thread used copro */

        unsigned long        tp_value;

        struct crunch_state    crunchstate;

        union fp_state        fpstate __attribute__((aligned(8)));

        union vfp_state        vfpstate;

    #ifdef CONFIG_ARM_THUMBEE

        unsigned long        thumbee_state;    /* ThumbEE Handler Base register */

    #endif

        struct restart_block    restart_block;

    };

通过上面的操作,寄存器r9中就是这个进程的thread_info结构的起始地址。

Re: 浅析基于ARM的Linux下的系统调用的实现

Posted: 2025-03-06T02:53:22+00:00
by 擎天殿
sys_call_table

entry-common.S (arch\arm\kernel)

Code: Select all

         .type    sys_call_table, #object

     ENTRY(sys_call_table)

     #include "calls.S"

     #undef ABI

     #undef OBSOLETE
其中,calls.S的内容如下:

Code: Select all

     /*

      *  linux/arch/arm/kernel/calls.S

      *

      *  Copyright (C) 1995-2005 Russell King

      *

      * This program is free software; you can redistribute it and/or modify

      * it under the terms of the GNU General Public License version 2 as

      * published by the Free Software Foundation.

      *

     *  This file is included thrice in entry-common.S

     */

    /* 0 */        CALL(sys_restart_syscall)

            CALL(sys_exit)

            CALL(sys_fork_wrapper)

            CALL(sys_read)

            CALL(sys_write)

    /* 5 */        CALL(sys_open)

            CALL(sys_close)

            CALL(sys_ni_syscall)        /* was sys_waitpid */

            CALL(sys_creat)

            CALL(sys_link)

    /* 10 */    CALL(sys_unlink)

            CALL(sys_execve_wrapper)

            CALL(sys_chdir)

            CALL(OBSOLETE(sys_time))    /* used by libc4 */

            CALL(sys_mknod)

    ......

    /* 355 */    CALL(sys_signalfd4)

            CALL(sys_eventfd2)

            CALL(sys_epoll_create1)

            CALL(sys_dup3)

            CALL(sys_pipe2)

    /* 360 */    CALL(sys_inotify_init1)

            CALL(sys_preadv)

            CALL(sys_pwritev)

    #ifndef syscalls_counted

    .equ syscalls_padding, ((NR_syscalls + 3) & ~3) - NR_syscalls

    #define syscalls_counted

    #endif

    .rept syscalls_padding

            CALL(sys_ni_syscall)

    .endr
关于这个部分的更多介绍参见:

http://www.cnblogs.com/pengdonglin137/p/3714981.html

Re: 浅析基于ARM的Linux下的系统调用的实现

Posted: 2025-03-06T02:53:55+00:00
by 擎天殿
bics r10, r10, #0xff000000

执行这个操作的时候,r10中存放的是SWI instruction,在我们的例子中就是(a.dis):

Image

即:r10 为 0xEF000000

显然,bics这条指令下面的两个语句由于条件不成立,无法获得执行。这条指令的作用是获得系统调用号

可以参考这个手册,看一下svc执行的格式:

https://files.cnblogs.com/pengdonglin13 ... _guide.pdf

Re: 浅析基于ARM的Linux下的系统调用的实现

Posted: 2025-03-06T02:55:14+00:00
by 擎天殿
Image

可以看到,[23:0]存放的就是svc指令后面的那个立即数,也即系统调用号。

不过需要注意的是:我们这里并没有这样做,我们的做法是(a.dis中可以看到):

Image

使用的是svc 0,后面跟的并不是系统调用号,而是0,这里把系统调用号存放在了寄存器r7中(a.dis中):

Image

可以看到,由于使用的sys_open系统调用,所以把它的系统调用号5存放到了寄存器r7当中

Re: 浅析基于ARM的Linux下的系统调用的实现

Posted: 2025-03-06T02:58:12+00:00
by 擎天殿
ldrcc pc, [tbl, scno, lsl #2] @ call sys_* routine

这里的scno是就是寄存器r7的别名,它的值是sys_open的系统调用号5,由于在calls.S中每个系统调用标号占用4个字节,所以这个将scno的值乘以4然后再加上tbl,tbl是系统调用表sys_call_table的基地址。然后就跳入开始执行sys_open了。

Code: Select all

asmlinkage long sys_open(const char __user *filename,
                int flags, int mode);
那么sys_open在哪呢?在内核源码中直接搜索sys_open,无法搜到它的实现代码,实际上它是在fs/open.c中实现的:

Code: Select all

     SYSCALL_DEFINE3(open, const char __user *, filename, int, flags, int, mode)

     {

         long ret;


         if (force_o_largefile())

             flags |= O_LARGEFILE;


         ret = do_sys_open(AT_FDCWD, filename, flags, mode);

         /* avoid REGPARM breakage on x86: */

        asmlinkage_protect(3, ret, filename, flags, mode);

        return ret;

    }
其中SYSCALL_DEFINE3是一个宏:

Code: Select all


syscalls.h (include\linux)

#define SYSCALL_DEFINE3(name, ...) SYSCALL_DEFINEx(3, _##name, __VA_ARGS__)

SYSCALL_DEFINEx也是一个宏:

syscalls.h (include\linux)

#define SYSCALL_DEFINEx(x, sname, ...)                \
    __SYSCALL_DEFINEx(x, sname, __VA_ARGS__)

__SYSCALL_DEFINEx仍然是个宏:

syscalls.h (include\linux)

#define __SYSCALL_DEFINEx(x, name, ...)                    \
    asmlinkage long sys##name(__SC_DECL##x(__VA_ARGS__))
所以展开后的结果就是:

Code: Select all

asmlinkage long sys_open(__SC_DECL3(__VA_ARGS__))
其中,__SC_DECL3定义如下:

syscalls.h (include\linux)

Code: Select all

     #define __SC_DECL1(t1, a1)    t1 a1

     #define __SC_DECL2(t2, a2, ...) t2 a2, __SC_DECL1(__VA_ARGS__)

     #define __SC_DECL3(t3, a3, ...) t3 a3, __SC_DECL2(__VA_ARGS__)
所以最终的结果如下:

Code: Select all

     asmlinkage long sys_open(const char __user *filename, int flags, int mode)

     {

         long ret;


         if (force_o_largefile())

             flags |= O_LARGEFILE;


         ret = do_sys_open(AT_FDCWD, filename, flags, mode);

         /* avoid REGPARM breakage on x86: */

        asmlinkage_protect(3, ret, filename, flags, mode);

        return ret;


    }
关于sys_open本身的实现这里就不深入分析了。

Re: 浅析基于ARM的Linux下的系统调用的实现

Posted: 2025-03-06T03:01:00+00:00
by 擎天殿
接下来看一下返回。

Code: Select all

    adr    lr, ret_fast_syscall        @ return address
当sys_open中return后,便跳入ret_fast_syscall处开始执行:

Code: Select all

     /*

    * This is the fast syscall return path.  We do as little as

      * possible here, and this includes saving r0 back into the SVC

      * stack.

      */

     ret_fast_syscall:

      UNWIND(.fnstart    )
      UNWIND(.cantunwind    )

         disable_irq                @ disable interrupts


ldr r1, [tsk, #TI_FLAGS] @将thread_info中的flags成员存放到r1中

        tst    r1, #_TIF_WORK_MASK

        bne    fast_work_pending  


        /* perform architecture specific actions before user return */

        arch_ret_to_user r1, lr


        @ fast_restore_user_regs

        ldr    r1, [sp, #S_OFF + S_PSR]    @ get calling cpsr

        ldr    lr, [sp, #S_OFF + S_PC]!    @ get pc

        msr    spsr_cxsf, r1            @ save in spsr_svc

        ldmdb    sp, {r1 - lr}^            @ get calling r1 - lr

        mov    r0, r0

        add    sp, sp, #S_FRAME_SIZE - S_PC

        movs    pc, lr                @ return & move spsr_svc into cpsr

     UNWIND(.fnend        )


    /*

     * Ok, we need to do extra processing, enter the slow path.

     */

    fast_work_pending:

        str    r0, [sp, #S_R0+S_OFF]!        @ returned r0

    work_pending:

        tst    r1, #_TIF_NEED_RESCHED       @判断是否需要进行进程调度

        bne    work_resched

        tst    r1, #_TIF_SIGPENDING

        beq    no_work_pending

        mov    r0, sp                @ 'regs'

        mov    r2, why                @ 'syscall'

        bl    do_notify_resume

        b    ret_slow_syscall        @ Check work again


work_resched:

        bl    schedule

    /*

     * "slow" syscall return path.  "why" tells us if this was a real syscall.

     */

    ENTRY(ret_to_user)

    ret_slow_syscall:

        disable_irq                @ disable interrupts

        ldr    r1, [tsk, #TI_FLAGS]

        tst    r1, #_TIF_WORK_MASK

        bne    work_pending

    no_work_pending:

        /* perform architecture specific actions before user return */

        arch_ret_to_user r1, lr


        @ slow_restore_user_regs

        ldr    r1, [sp, #S_PSR]        @ get calling cpsr

        ldr    lr, [sp, #S_PC]!        @ get pc
        msr    spsr_cxsf, r1            @ save in spsr_svc

        ldmdb    sp, {r0 - lr}^            @ get calling r0 - lr

        mov    r0, r0

        add    sp, sp, #S_FRAME_SIZE - S_PC

        movs    pc, lr                @ return & move spsr_svc into cpsr

    ENDPROC(ret_to_user)
在返回的时候要看是否要进行进程调用。

Image

先分析到这里。